
Custom Participant Properties may include any information Users know or want to capture regarding Study Participants that is not already captured by the Standard Participant Properties.
The requirements for naming Participant List Columns are similar to those for naming Surveys and Variables.
The following is a list of the requirements:2-128 characters in length
Starts with a capital A-Z or 0 - 9
Following characters can be A-Z, 0-9, underscore (_), hyphen (-), or period (.)
Cannot use DATSTAT as this is reserved for Standard Properties
It is advised to use INTEGER properties with scales instead of using TEXT properties for those properties that have a finite list of values.
The Property Fields are the same for both Standard and Custom Participant Properties.
NOTE: * denotes a required field
Name* - The Name of the Participant Property
Data Type* - Defines the way the data is stored
Possible Data Types:
Label* - Text the User sees when Adding/Editing a Participant
Display Type* - The Control that is output when Adding/Editing a Participant
Drop-Down List (a.k.a. “Pop List”), Hidden, Multi-Line Text Box (a.k.a. “Commentary”), Option Group (a.k.a. “Radio Button”), Text Box. The default Display Type is Hidden, meaning this field will NOT be shown when editing a participant. If this field should be visible when editing a participant, then the display type should be changed from Hidden to a different type.
Property Group* - The Group Name of the Fields. Specifying a Property Group allows Users the ability to group Properties together, making them easier to find. In addition, when viewing a Participant, Property Groups are presented in alphabetical order, so putting critical properties in an “early” Property Group ensures they will be presented at the top of the screen. DatStat recommends using numbers as a prefix for group names so that the order of your groups is organized the way you prefer, for example 01: Patient Contact Information 02: Patient Study Progress, etc)
NOTE: Property Group names are Case Sensitive - They must be typed exactly the same for each Property in that Group or there will be a separate group created (i.e. “Consent Variables” is not the same as “Consent variables”).
Order in Group* - Within a Property Group, this is the order in which a particular Participant Property will be presented.
NOTE: Order is not enforced but is respected. In other words, if you have three properties in the same group marked as “Order in Group=1”, an error will not be presented. Rather, Discovery will present those properties in random order as the first three properties.
Parent Column - Used to identify the Parent for a Dependent Property
Error Message - Error Message that will display if the property is entered incorrectly when Adding/Editing a Participant. For example, if integer data type is specified for a property and non-integer data are entered when editing a participant, this error message will appear and will prevent the User from saving that participant until the data are changed.
Default Value - If the property uses a scale, you may define that the property defaults to a particular scale value. The Default Value must match one of the scale values if they are defined
Description - A text description of the Participant Property
Required? - Check box to make this a required property when Adding/Editing a Participant
Disabled? - Check box to remove it from view during Adding/Editing a Participant
Allow Bulk Update? - Check box to allow a User with sufficient Privileges to use the Bulk Update Action for this Property value.
Unique? - Check box which will require that the Property value is unique across all Participants in the Study. It will prevent duplicate entries by presenting an error message. This is typically used for ID and Email Address fields.
Indexed? - Check box which creates a database index on this Property field to increase speed of search/query.
NOTE: If Indexing is used too frequently it will decrease over-all performance of the system.
Data Validation - Specifies Formats and Bounds for the Property to ensure the data are correctly inputted.
The Custom Participant Properties can be given scale values by Clicking on the Add New Scale Value link in the Scale Tab. The Data Type must be Integer and it has to be a drop-down/poplist – you can enter numeric or text as the value/code
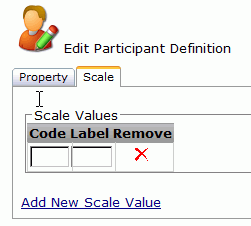
Code - Scale Value for that possible response
If a Numeric data type is chosen then it will be Numeric
If a Text data type is chosen it can be textual
Label - Visible Text associated with Code
NOTE: Scale Values must match the defined Data Type. e.g. Use 1,2,3 if Integer was selected
After the first code and label has been added, click “Add New Scale Value” to add another. Continue this process until all have been created.
Participant Properties can have Exclusions set to give Full, Read Only or Hidden access to Users or User Groups.
A Participant Property may have multiple Exclusions applied. See the Section on User Access Exclusions for more details
DatStat Discovery uses Microsoft's .NET DateTime object to store dates and times. The .NET DateTime object can represent dates between 12:00 a.m. January 1, 0001 CE and 11:59:59 p.m. on December 31, 9999. Illume considers dates outside of this range to be invalid. Non-existent dates are also invalid. For example, February 29, 2005 is invalid because 2005 is not a leap year. Participant must enter dates or times in a format that .NET recognizes. In general, for the United States locale, dates in the following formats are valid:
Other date formats will also work in the US. You should, however, suggest a format that you know will work in either your question prompt or in the question label. For example, a prompt that suggests a valid format would be: Please enter your date of birth (mm/dd/yyyy): Illume and .NET recognize both 12- and 24-hour time formats, though Discovery may ignore the seconds. The following time formats are valid in the US locale:
.NET uses the same standard set of date and time formats that other Microsoft products use. This means that any Date, Time, or Date/Time format produced by an application like Microsoft Excel, Access, or SQL Server will work in Illume. Use the Date data type only for variables that must include a day, month, and year. If your variable requires only one of these values (day or month or year), choose the whole number or text data type. Choose Date/Time data type only for variables that require a day, month, and year value with an optional time value.
Discovery and .NET use the locale settings of the Illume server to determine dates and times. This can cause some confusion if a survey is not designed correctly. For example, if you are administering a survey to participants in both the US and the UK, you should be aware that the two locales use different date formats. A US participant entering 06/12/2006 will mean June 12, 2006, while a British participant entering the same thing will mean December 12, 2006. If the survey is running on a server whose locale is set to EN-US (English, United States), the date will always be interpreted as June 12. If the server's locale is set to EN-GB (English, Great Britain), the date will always be interpreted as December 6. This will be a problem if your question includes a minimum and/or maximum date. The British User or the US User may not be able to get past the date question simply because the participant and the server do not agree on what the date means. One way to avoid date/time problems caused by local differences is to break dates and times into separate questions, each of which is of type whole number. For example, instead of asking for a participant's birth date, ask for his or her year of birth, then month of birth, then day of birth.
When testing or running a study, Users may realize that a Participant Property is needed that was not already created.
Users must first determine is if this Property should be created at the Master or Derived list level. If the Master list feeds into multiple derived lists OR information is being captured on participants at the master list level, not within the Discovery Study interface then add to a Master. If the Property is only relevant to the specific study to which the participants are enrolled, then the Property should be created at the Derived list level.